jueves, 27 de diciembre de 2018

Cambiar/Agregar Semaforos

Para cambiar/ agregar semaforos en el sistema operativo, realizar :

Chequear los parametros actuales
~]# ipcs -sl

------ Semaphore Limits --------
max number of arrays = 128
max semaphores per array = 250
max semaphores system wide = 32000
max ops per semop call = 32

semaphore max value = 32767

ipcs -s | wc -l

129

Con esto, cambio los valores 
echo kernel.sem = 250 64000 32 256 >>/etc/sysctl.conf

Con esto relee el archivo systctl.conf
sysctl -p 

Chequeo que haya tomado efecto los cambios
# ipcs -sl

------ Semaphore Limits --------
max number of arrays = 256
max semaphores per array = 250
max semaphores system wide = 64000
max ops per semop call = 32
semaphore max value = 32767

# sysctl kernel.sem
kernel.sem = 250        64000   32      256
[root@webmail-03 ~]#

# grep sem /etc/sysctl.conf
kernel.sem = 250 64000 32 256


Instalar Centrify

Para instalar Centrify por primera vez, Si esta instalado el Access Control previamente, primero desisntalar el AC

# /opt/CA/eTrustAccessControl/lbin/uninstall_AC
Trying to unload CA ControlMinder...
CA ControlMinder is successfully unloaded.

UnInstalling CA ControlMinder from /opt/CA/eTrustAccessControl

The uninstall utility is about to remove the entire
CA ControlMinder directory: /opt/CA/eTrustAccessControl
If you wish to keep certain files for future use or
reference, do NOT continue.

Continue with uninstall now? [Y/n]:   y
Removing CA ControlMinder service from /etc/services
Removing CA ControlMinder system call loader.
Trying to remove references to CA ControlMinder from the system init files.
Removing CA ControlMinder PAM module from your system.
Restoring /etc/pam.d/login by removing last changes made to file
Removing CA ControlMinder Admin tools binaries and directories.
Removing CA ControlMinder Admin tools X-resource files.
The CA ControlMinder Admin tools files have now
been removed from your system.
Removing seos.ini from /etc
The token global.AC_Version, now set to 'none', (was '12.81.0.19')
Removing ControlMinder from AccessControl Shared dependency list
Removing AccessControl Shared
Removing CAPKI.
Removing CA ControlMinder binaries and directories.

UnInstall complete.

The CA ControlMinder files have now been removed.

Warning: If you have replaced /bin/passwd with sepass,
         You must restore the original /bin/passwd.

         You may edit your /etc/passwd and /etc/group
         files, in order to remove unnecessary users.

#

Una vez desinstalado el AC,  borrar el archivo  /lib/security y crearlo como un directorio
mkdir /lib/security

Ahora si, instalo el Centrify

yum localinstall CentrifyDC-openssl-5.5.0-rhel5.x86_64.rpm  CentrifyDC-openldap-5.5.0-rhel5.x86_64.rpm CentrifyDC-curl-5.5.0-rhel5.x86_64.rpm \
CentrifyDC-5.5.0-rhel5.x86_64.rpm  CentrifyDC-nis-5.5.0-rhel5.x86_64.rpm CentrifyDA-3.5.0-rhel5.x86_64.rpm -y

Si necesito Desinstalar el Centrify, el orden es el siguiente:
rpm -e CentrifyDA-3.5.0-155.x86_64
rpm -e CentrifyDC-nis-5.5.0-200.x86_64
rpm -e CentrifyDC-5.5.0-200.x86_64
rpm -e CentrifyDC-curl-5.5.0-200.x86_64
rpm -e CentrifyDC-openldap-5.5.0-200.x86_64
rpm -e CentrifyDC-openssl-5.5.0-200.x86_64

miércoles, 6 de junio de 2018

Copiar luns en caliente con pvmove en lvm

Una maniobra tipica cuando queremos cambiar de caja de storage presentada en un equipo sin corte de servicio.

Una vez asignadas las luns nuevas al equipo las reconocemos y la metemos dentro de lvm.
Para reconocerlas utilizaremos rescan-scsi-bus.sh que viene en el pkg sg3_utils asi que vamos a comenzar instalandolo.

yum install sg3_utils

Rescaneamos discos y lo agregamos a multipath:

rescan-scsi-bus.sh
multipath -F;multipath -v2
multipath -ll

Agregamos los devices a la configuracion de multipath y volvemos a rescanear.
vi /etc/multipath.conf
multipaths {
        multipath {
                wwid                 XXXXXXXXXXXXXXXXX
                alias                   mp_01
        }
multipaths {
        multipath {
                wwid                 XXXXXXXXXXXXXXXXX
                alias                   mp_02
        }
Volvemos a refrescar la configuracion de multipath para que tome los cambios. 
multipath -F; multipath -v2

Creamos las particiones
fdisk /dev/mpath/mp_01 
( n - p - 1 - enter - enter - w )
fdisk /dev/mpath/mp_02 
( n - p - 1 - enter - enter - w )

partprobe /dev/mapper/mp_01
partprobe /dev/mapper/mp_02

Lo agregamos a lvm
pvcreate /dev/mapper/mp_01p1
pvcreate /dev/mapper/mp_02p1

Lo agregamos al vg
vgextend vgst /dev/mapper/mp_01p1
vgextend vgst_backup /dev/mapper/mp_02p1


Es muy importante si es un cluster freezar el servicio
clusvcadm -Z SERV1

Movemos la info de un pv a otro
pvmove /dev/dm-XX /dev/mapper/mp_01p1
pvmove /dev/dm-XY /dev/mapper/mp_02p1

Sacamos los pv viejos del vg
vgreduce vgst /dev/dm-XX
vgreduce vgst_backup /dev/dm-XY

Sacamos los discos de la configuracion.
pvremove /dev/dm-XX
pvremove /dev/dm-XY


miércoles, 28 de febrero de 2018

Agregar relay host para envio de mails en postfix o sendmail

Primero lo comun a ambos. Verificar que llegemos al relay y al puerto 25

el relay host es smtp2.midominio.com.ar

Primero vemos si se resuelve el hostname con ping.

ping smtp2
PING smtp2.midominio.com.ar (10.4.33.103) 56(84) bytes of data.
64 bytes from 10.4.33.103: icmp_seq=1 ttl=127 time=0.861 ms
64 bytes from 10.4.33.103: icmp_seq=2 ttl=127 time=0.633 ms
^C
--- smtp2.midominio.com.ar ping statistics ---
2 packets transmitted, 2 received, 0% packet loss, time 1408ms
rtt min/avg/max/mdev = 0.633/0.747/0.861/0.114 ms

En caso que no funcione agregamos la ip al /etc/hosts o configuramos correctamente el /etc/resolv.conf para que resuelva por dns

telnet smtp02 25
220 mailbox.midominio.com.ar Microsoft ESMTP MAIL Service ready at Wed, 28 Feb 2018 14:42:15 -0300
helo
250 mailbox.midominio.com.ar Hello [XX.XX.XX.XX]
quit
221 2.0.0 Service closing transmission channel
Connection closed by foreign host.


Con esto aseguramos que llegamos al relay.


Ahora el agregado es muy sencillo en postfix agregamos o modificamos el parametro relayhost en /etc/postfix/main.cf
tiene que qedar asi:
relayhost=[smtp2.midominio.com.ar]

en caso de que sea sendmail modificamos en /etc/mail/sendmail.cf  la linea que empieza con DS para que quede asi:
DS[smtp2.midominio.com.ar]


En cualquiera de los dos casos reiniciamos el servicio de correo
con alguno de estos comandos

systemctl restart postfix
service postfix restart

systemctl restart sendmail
service sendmail restart


Probamos un envio de mail.
echo "This is a test." | mail -vvv -s "Prueba" nicolasm@midominio.com.ar

martes, 24 de octubre de 2017

Agregar espacio a un filesystem agregando un disco con lvm

Tenemos un equipo, para el que necesitamos hacer crecer un filesystem de aplicacion en 50gb.

Asi se ve el fs antes de aplicar cualquier cambio.

[root@linux3 ~]# df -h | grep opt
/dev/mapper/VG_optaplicacion-lv_optaplicacion
                      118G  100G   13G  89% /opt/aplicacion

La tarea se divide en cuatro partes principales
#1   Agregar el disco/lun fisicamente.
#2   Reconocer/Formatear el disco dentro del sistema operativo.
#3   Agregar el device dentro de lvm.
#4   Hacer crecer el file system.


#1   Agregar el disco/lun fisicamente.
Este equipo es una virtual de vmware, lo vemos asi

[root@linux3 ~]#  dmidecode -t system | less
# dmidecode 2.12
SMBIOS 2.4 present.

Handle 0x0001, DMI type 1, 27 bytes

System Information
        Manufacturer: VMware, Inc.
        Product Name: VMware Virtual Platform

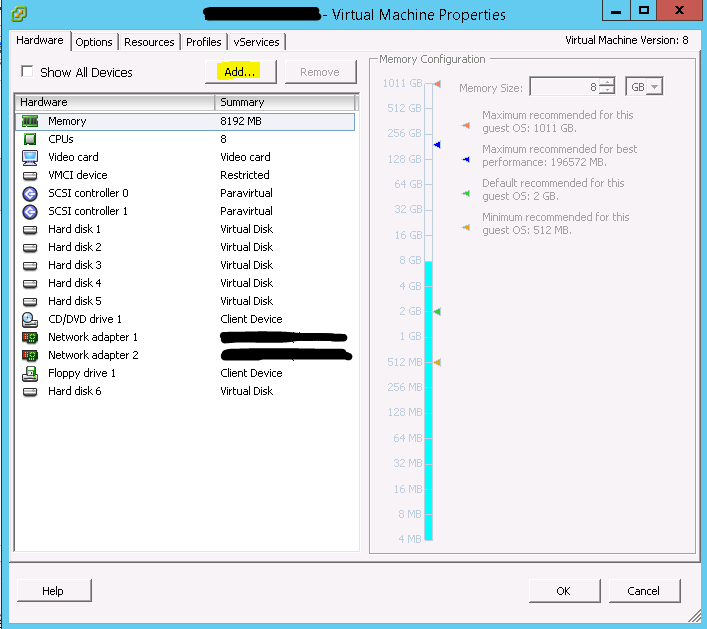
Por lo que, el disco, se lo agrego desde el vcenter, como muestra en las siguientes imagenes (estan editadas para no mostrar info sensible)

Edit Settings:
 Add:
 Hard Disk:


#2   Reconocer/Formatear el disco dentro del sistema operativo.

El disco ya esta asignado al equipo fisicamente, lo buscamos con:
[root@linux3 ~]# fdisk -l
...
...
Disk /dev/sdg: 53.7 GB, 53687091200 bytes
64 heads, 32 sectors/track, 51200 cylinders
Units = cylinders of 2048 * 512 = 1048576 bytes
Sector size (logical/physical): 512 bytes / 512 bytes
I/O size (minimum/optimal): 512 bytes / 512 bytes
Disk identifier: 0x00000000

Como vemos, el disco, no tiene particion, asi que se la creamos con fdisk

[root@linux3 ~]#  fdisk /dev/sdg
Device contains neither a valid DOS partition table, nor Sun, SGI or OSF disklabel
Building a new DOS disklabel with disk identifier 0x5883c851.
Changes will remain in memory only, until you decide to write them.
After that, of course, the previous content won't be recoverable.

Warning: invalid flag 0x0000 of partition table 4 will be corrected by w(rite)


WARNING: DOS-compatible mode is deprecated. It's strongly recommended to

         switch off the mode (command 'c') and change display units to
         sectors (command 'u').

Command (m for help): n

Command action
   e   extended
   p   primary partition (1-4)
p
Partition number (1-4): 1
First cylinder (1-51200, default 1): 
Using default value 1
Last cylinder, +cylinders or +size{K,M,G} (1-51200, default 51200): 
Using default value 51200

Command (m for help): t

Selected partition 1
Hex code (type L to list codes): 8e
Changed system type of partition 1 to 8e (Linux LVM)

Command (m for help): w

The partition table has been altered!

Calling ioctl() to re-read partition table.

Syncing disks.
[root@linux3 ~]# 


#3   Agregar el device dentro de lvm.

Necesito meter el disco recien agregado dentro del vg de lvm que estoy utilizando. Arriba de todo, habia tirado un df -h que me mostraba que el vg en cuestion es VG_optaplicacion

[root@linux3 ~]# vgs
  VG            #PV #LV #SN Attr   VSize   VFree
  VG_logaplicacion   1   1   0 wz--n- 249.99g    0 
  VG_optaplicacion   3   1   0 wz--n- 119.99g    0 
  VolGroup00      2   7   0 wz--n- 149.56g 9.56g

lo amplio:

[root@linux3 ~]# vgextend VG_optaplicacion /dev/sdg1  
  Physical volume "/dev/sdg1" successfully created
  Volume group "VG_optaplicacion" successfully extended

Ahora, hago crecer el lv del tamaño de todo el disco que le puse.

[root@linux3 ~]# lvextend /dev/VG_optaplicacion/lv_optaplicacion /dev/sdg1
  Size of logical volume VG_optaplicacion/lv_optaplicacion changed from 119.99 GiB (30717 extents) to 169.98 GiB (43516 extents).
  Logical volume lv_optaplicacion successfully resized.


#4   Hacer crecer el file system.

Ahora, solo hace falta hacer crecer el fs, o sea, que se vea cuando tiro un df y que se pueda usar.

[root@linux3 ~]# resize2fs /dev/VG_optaplicacion/lv_optaplicacion 
resize2fs 1.41.12 (17-May-2010)
Filesystem at /dev/VG_optaplicacion/lv_optaplicacion is mounted on /opt/aplicacion; on-line resizing required
old desc_blocks = 8, new_desc_blocks = 11
Performing an on-line resize of /dev/VG_optaplicacion/lv_optaplicacion to 44560384 (4k) blocks.
The filesystem on /dev/VG_optaplicacion/lv_optaplicacion is now 44560384 blocks long.


Chequeo que todo este bien y listo el pollo.

[root@linux3 ~]# df -h | grep opt
/dev/mapper/VG_optaplicacion-lv_optaplicacion
                      168G  100G   60G  63% /opt/aplicacion

miércoles, 23 de agosto de 2017

Agregar repositorios optional y extras red hat satellite.

Esta es una entrada sencilla para agregar repositorios extra de nuestro satelite ya configurado a nuestro servidor.

Desde nuestro servidor p-01 vemos que repositorios tenemos configurados.

[root@p-01 ~]# yum repolist 
Loaded plugins: langpacks, product-id, search-disabled-repos, subscription-manager
repo id                                                    repo name                                                          status
!rhel-7-server-optional-rpms/7Server/x86_64                Red Hat Enterprise Linux 7 Server - Optional (RPMs)                12,683
!rhel-7-server-rpms/7Server/x86_64                         Red Hat Enterprise Linux 7 Server (RPMs)                           16,956
repolist: 29,639

En este caso estan los rhel-7-server-rpms y rhel-7-server-optional-rpms

Verifico que repositorios tengo disponibles para habilitar
Me muestra el nombre la url y si esta o no habilitado.

[root@p-01 ~]# subscription-manager repos --list


+----------------------------------------------------------+
    Available Repositories in /etc/yum.repos.d/redhat.repo
+----------------------------------------------------------+
Repo ID:   rhel-7-server-satellite-tools-6.2-rpms
Repo Name: Red Hat Satellite Tools 6.2 (for RHEL 7 Server) (RPMs)
Repo URL:  https://sat.xxx/pulp/repos/xxx/Library/content/dist/rhel/server/7/7Server/$basearch/sat-tools/6.2/os
Enabled:   0

Repo ID:   rhel-server-rhscl-7-rpms
Repo Name: Red Hat Software Collections RPMs for Red Hat Enterprise Linux 7 Server
Repo URL:  https://sat.xxx/pulp/repos/xxx/Library/content/dist/rhel/server/7/$releasever/$basearch/rhscl/1/os
Enabled:   0

Repo ID:   rhel-7-server-optional-rpms
Repo Name: Red Hat Enterprise Linux 7 Server - Optional (RPMs)
Repo URL:  https://sat.xxx/pulp/repos/xxx/Library/content/dist/rhel/server/7/$releasever/$basearch/optional/os
Enabled:   1

Repo ID:   rhel-7-server-openstack-10-tools-rpms
Repo Name: Red Hat OpenStack Platform 10 Tools for RHEL 7 Server (RPMs)
Repo URL:  https://sat.xxx/pulp/repos/xxx/Library/content/dist/rhel/server/7/$releasever/$basearch/openstack-to
           ols/10/os
Enabled:   0

Repo ID:   rhel-7-server-rh-common-rpms
Repo Name: Red Hat Enterprise Linux 7 Server - RH Common (RPMs)
Repo URL:  https://sat.xxx/pulp/repos/xxx/Library/content/dist/rhel/server/7/$releasever/$basearch/rh-common/os
Enabled:   0

Repo ID:   rhel-7-server-rhn-tools-rpms
Repo Name: RHN Tools for Red Hat Enterprise Linux 7 Server (RPMs)
Repo URL:  https://sat.xxx/pulp/repos/xxx/Library/content/dist/rhel/server/7/$releasever/$basearch/rhn-tools/os
Enabled:   0

Repo ID:   rhel-7-server-v2vwin-1-rpms
Repo Name: Red Hat Virt V2V Tool for RHEL 7 (RPMs)
Repo URL:  https://sat.xxx/pulp/repos/xxx/Library/content/dist/rhel/server/7/$releasever/$basearch/v2vwin/os
Enabled:   0

Repo ID:   rhel-7-server-rpms
Repo Name: Red Hat Enterprise Linux 7 Server (RPMs)
Repo URL:  https://sat.xxx/pulp/repos/xxx/Library/content/dist/rhel/server/7/$releasever/$basearch/os
Enabled:   1

Repo ID:   rhel-7-server-supplementary-rpms
Repo Name: Red Hat Enterprise Linux 7 Server - Supplementary (RPMs)
Repo URL:  https://sat.xxx/pulp/repos/xxx/Library/content/dist/rhel/server/7/$releasever/$basearch/supplementar
           y/os
Enabled:   0

Repo ID:   rhel-7-server-extras-rpms
Repo Name: Red Hat Enterprise Linux 7 Server - Extras (RPMs)
Repo URL:  https://sat.xxx/pulp/repos/xxx/Library/content/dist/rhel/server/7/7Server/$basearch/extras/os
Enabled:   0

Habilito el que me falta y reviso

[root@p-01 ~]# subscription-manager repos --enable rhel-7-server-extras-rpms


[root@p-01 ~]# yum repolist
Loaded plugins: langpacks, product-id, search-disabled-repos, subscription-manager
rhel-7-server-extras-rpms                                                                                    | 2.0 kB  00:00:00     
rhel-7-server-optional-rpms                                                                                  | 2.0 kB  00:00:00     
rhel-7-server-rpms                                                                                           | 2.0 kB  00:00:00     
(1/9): rhel-7-server-extras-rpms/x86_64/group                                                                |  130 B  00:00:00     
(2/9): rhel-7-server-extras-rpms/x86_64/updateinfo                                                           | 182 kB  00:00:00     
(3/9): rhel-7-server-extras-rpms/x86_64/primary                                                              | 154 kB  00:00:00     
(4/9): rhel-7-server-optional-rpms/7Server/x86_64/group                                                      |  19 kB  00:00:00     
(5/9): rhel-7-server-optional-rpms/7Server/x86_64/updateinfo                                                 | 1.6 MB  00:00:00     
(6/9): rhel-7-server-optional-rpms/7Server/x86_64/primary                                                    | 3.6 MB  00:00:00     
(7/9): rhel-7-server-rpms/7Server/x86_64/group                                                               | 595 kB  00:00:00     
(8/9): rhel-7-server-rpms/7Server/x86_64/updateinfo                                                          | 2.2 MB  00:00:00     
(9/9): rhel-7-server-rpms/7Server/x86_64/primary                                                             |  23 MB  00:00:00     
rhel-7-server-extras-rpms                                                                                                   603/603
rhel-7-server-optional-rpms                                                                                             12683/12683
rhel-7-server-rpms                                                                                                      16956/16956
repo id                                                    repo name                                                          status
!rhel-7-server-extras-rpms/x86_64                          Red Hat Enterprise Linux 7 Server - Extras (RPMs)                     603
!rhel-7-server-optional-rpms/7Server/x86_64                Red Hat Enterprise Linux 7 Server - Optional (RPMs)                12,683
!rhel-7-server-rpms/7Server/x86_64                         Red Hat Enterprise Linux 7 Server (RPMs)                           16,956
repolist: 30,242

viernes, 11 de agosto de 2017

Conectarse por consola a un redhat linux instalado en un Dell PowerEdge R910 por ssh:

Nos encontramos con el equipo encendido y funcionando ok y queremos dejar configurada la consola para acceder al management por ssh y de ahi conectarnos por serial al linux.

Se modifico el archivo /etc/inittab en el linux se agrego la siguiente linea (despues de probar varias velocidades)
co:2345:respawn:/sbin/agetty -h -L 115200 ttyS1

Se agrego la linea ttyS1 al final del archivo
/etc/securetty

Se le dio kill -1 al init.


Ahora nos conectamos al idrac (la ilom de dell) por ssh
ssh root@10.XX.XX.XX
password: calvin  (es la default)

/admin1-> console com2

Connected to Serial Device 2. To end type: ^\
plnxxx.redhat4ever.com.ar login:


Si queremos ver la consola desde el grupo o sea ver como bootea el equipo debemos tambien configurar unas lineas del /etc/grub.conf

agregamos
serial --unit=1 --speed=115200
terminal --timeout=10 serial
comentamos
#splashimage=(hd0,2)/grub/splash.xpm.gz
#hiddenmenu

y modificamos la linea del kernel
 kernel .......... console=ttyS1,115200n8r console=tty1